
Selecting Shuttles & Accessories
Boat Shuttles: Part 1
Shuttle Styles, Bobbins and Quills, Throwing a Shuttle
A weaver recently asked how to prevent the bobbins from catching in her double bobbin shuttle. This problem is less about double bobbin shuttles than it is about bobbins and boat shuttles in general, because it is when you start using a double bobbin shuttle that you learn that you must improve your bobbin winding techniques. And, it just might be what starts your evaluation of your single bobbin shuttle and your choice of bobbins to find out why you have that occasional problem with it.
Learning to Use a Boat Shuttle and Bobbin
A properly made shuttle and bobbin will work perfectly, but we need to learn how to use them. There are some things that we learn right away. We know how tempting it is to wind just a little more thread on the bobbin, though we know all too well, that too much usually leads to trouble. We also quickly learn that a bobbin must be wound with a little tension applied or else the thread can get pulled down into the spongy weft on the bobbin.
Have you ever wondered if the thread should come from the bottom or the top of your bobbin? Look to your spindle for the answer. Look into the thread hole to see if the spindle is lower or higher than the hole. It usually is higher and then it is best to have the thread come from below, to allow it to move in a straighter path.
How does your bobbin work while you are weaving?
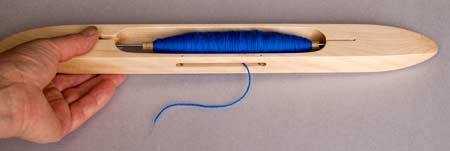
To see how your bobbin moves when you are weaving, put a nearly empty bobbin into your shuttle. Hold the shuttle in one hand and pull the thread out, watching how the bobbin moves as the thread passes through the hole. To show how the bobbin works when you are weaving a wide warp or weaving faster, pull more thread out and pull it out faster. You will see that the bobbin moves to the left when the thread is coming off the right side of the bobbin. Then as the thread continues to come of, it will come from the left end, and the bobbin will move to the right side of the bobbin box. The bobbin moves from the pull of the thread, as the unwinding thread needs to be closer to the hole to unwind freely.
The bobbin needs extra space inside the shuttle to move back and forth with the demand of the thread. If the bobbin catches, you will notice that it is because the thread is coming from the end of the bobbin and cannot pull more thread off the bobbin. The other end of the bobbin has hit its end of the bobbin box. If the bobbin is not at least one half inch or up to 1 inch shorter than the bobbin box of the shuttle, it cannot slide far enough to do this. Some shuttle makers cut the exit hole longer on their long shuttles to help you be successful with your shuttle, but the bobbin still needs space to move back and forth.
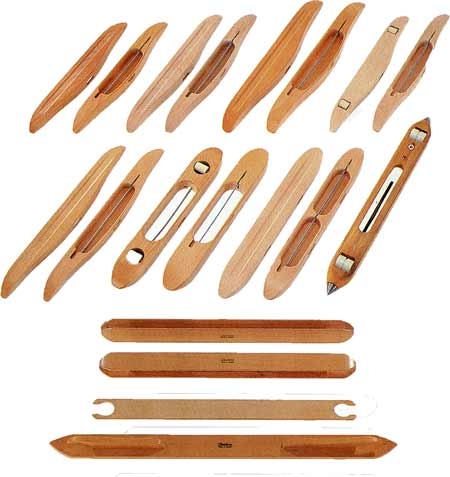
These are three of my favorite shuttles.
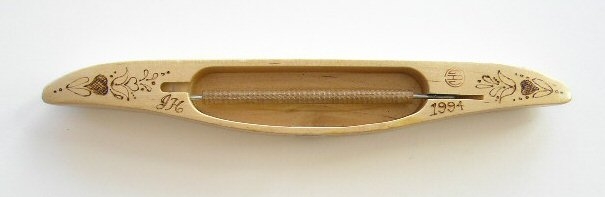
The newer one on the top left I decorated with my initials and the date 1994 when I got it. It is 11 1/4 inches long, 7/8 inches tall and has a 5 inch spindle. It can hold a 4 to 4 1/2 inch quill or bobbin. It weighs 2 1/2 oz. The curve of the bobbin box puts the hole further away from the bobbin, making it easier for the thread to wind off the bobbin. This explains the bulging curve of traditional shuttles.

The second shuttle is an antique weighted shuttle from Sweden which I like to use for fine wefts. It is shorter, 10 1/2 inches long, 3/4 inches tall and has lead weights inserted into the ends, making it weigh 3 oz.
The third shuttle is a new weighted damask shuttle from Sweden for weaving wide warps, designed by the damask weaver, Folke Samualson. It is 14� long, holds a 6 inch quill and weighs 4 3/4 oz.
What is the proper length of a bobbin or quill?
If a bobbin is too long for your shuttle box, it puts too much drag on the thread as it unwinds. When the bobbin does not have enough space to move back and forth, it�s ends will be rubbing on the wood in the shuttle box, causing more drag on your thread. This slows the bobbin so you are required to throw it with more effort to get it across the warp, and your selvages get pulled in too much. If that is happening, use a shorter bobbin. If a shorter bobbin is not available, you can switch to quills, which can be cut the right length and which unwind more easily.
Is your bobbin causing you to develop some bad habits?
If your bobbin is too long, or it does not fit your shuttle, it will sometimes get caught and your selvage gets pulled. If this happens frequently, you can develop the bad habit of pulling out thread from the bobbin before throwing the shuttle. Or worse yet, you throw the shuttle almost to the other selvage, then pinch the selvage to hold it as you pull the shuttle out of the shed. You do this, just in case the bobbin gets caught in the shuttle box. This is awkward, does not produce good selvages, and does not solve the underlying problem. The problem is usually because the bobbin was not made for your shuttle or it is too long. Switching to quills is an easy solution.
How to Wind a Bobbin or Quill
Windinq a bobbin correctly will make you love your shuttle. And, proper winding methods can make you enjoy throwing your shuttle. If you suspect that how you wind the bobbin is the problem, try winding it as follows.
First, remember not to wind too many rounds at the sides of the bobbin before reversing direction. If you do this, the thread will not unwind properly. When a bobbin unwinds, the thread is moving back and forth just as your hand moved back and forth when you wound it. And the bobbin is also moving back and forth inside the box, as the exiting thread is pulled through the hole. If you wind too many rounds at the side of a bobbin, the thread pushes the bobbin to the opposite end of the shuttle box, where it might jam itself against the wood. As you wind a bobbin, the hand which holds the thread should keep moving back and forth quickly.
Second, you may have noticed that when you begin winding a bobbin, small bumps will form at the sides of the bobbin. This naturally happens after you start winding because you are reversing direction as you wind back and forth. You may have read that you should deliberately make these bumps when starting to wind the bobbin. If you do this, the bobbin will usually catch just as the bobbin empties. If this is the way you wind the bobbin, you are probably in the habit of expecting that tug at the end and dealing with it on your last two or three shots across the warp. Wind your bobbins by moving your hand back and forth quickly. You will still get some build-up at the ends, but this results from many successive trips back and forth. As you wind the bobbin, the bumps get bigger and gradually form closer to the center of the bobbin. Never wind the successive rounds outside the bumps. Your path back and forth gets narrower and narrower as the bobbin fills, so that in the end you are only winding in the center, which is then thicker. The shape bulges in the center, tapering out to the ends. You may have thought that only quills need to be wound this way, but it is also the best way to wind bobbins.
What to do if the bobbin catches inside the shuttle box?
It has been suggested that putting beads on the shuttle spindle on each side of the bobbin will prevent the bobbin from getting caught. But, the bobbin needs the room to move back and forth, and the beads will take away some of this space, creating more drag on the thread. If your bobbin or quill catches at the end of the spindle, it is better to put a thin metal washer here, which will prevent the bobbin from rubbing on the wood. The bobbin will still have space to move back and forth.
Thumbs Up for Weaving
Catch your shuttle with your thumbs up, rather than putting your thumb under the shuttle. This is better for your hands and your arms and is easier to do. Habits are hard to change, but give it a try.
Slender and Pointed Shuttles
A slender shuttle with long pointed ends gives you a place to hold the shuttle, giving you more ease of handling. A thick or blunt ended shuttle is harder to grab and more likely to fall to the floor. Shuttles have thin, pointed ends to make them easy to catch. Long tapered ends are also helpful for going through sheds without picking up the wrong threads. A longer shuttle is good to use for wide warps, as it is easier to throw further and it will hold more thread.
Other Shuttle Features
Some shuttles have rollers on the bottom for use on wider warps. Some older shuttles have the underside carved out to lessen the surface which slides on the warp threads. Look at the hole in your shuttle where the thread comes out. It is usually reinforced with metal to prevent wear. Ordinary boat shuttles weigh about 3 oz (without the thread), so weigh your shuttle to see if you are throwing some extra weight.
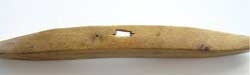

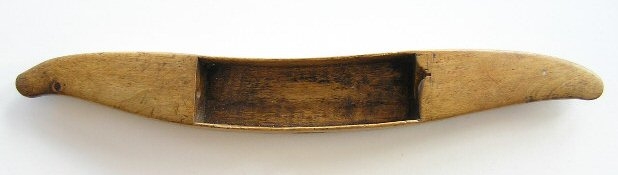
This is an antique shuttle which has had a lot of use. There was no reinforcement of the hole and you can see the wear that the thread made into the wood.
Alternatives to Bobbins
If you find that your bobbin is frequently catching at the end of the bobbin box, or it creates too much drag on the thread, or you think that the bobbins are too long for the shuttle, then cardboard or paper quills will work better for you. You can purchase them or make your own paper ones and then cut them the right size. They are very quiet and they are also inexpensive. Paper quills are easy to make and can be cut to any size. More about making them next time.
Boat Shuttles: Part II Success with boat shuttles made for two bobbins, traditional shuttle design, end delivery shuttles and making your own paper quills
Why use a double bobbin shuttle?
You have learned to evaluate your bobbin and your shuttle and how to wind a bobbin. So, lets explore using a double bobbin shuttle. It is often useful for weaving doubled weft yarns so you can double the size of the weft, blend colors, textures or types of thread, or use a thread doubled to get the right effect. Winding two threads together on one bobbin or quill is sometimes not the right solution, as the tension of the two threads might not stay the same as they unwind. One thread will sometimes stick out farther than the other at the selvage because it is longer. This is when a double bobbin shuttle is a good solution. The shuttle might be a little longer than you are accustomed to, but you simply weave as if you were using a single bobbin shuttle. With properly wound bobbins or quills, the double bobbin shuttle will work perfectly.
Winding Quills for the Double Bobbin Shuttle
Using a double bobbin shuttle requires that you have the proper bobbins or quills for your shuttle and know how to wind bobbins or quills that unwind successfully. If you have had trouble with your regular boat shuffle, you should solve your problems before trying to deal with two bobbins. The fact that there are two bobbins means that putting a thumb or finger on the bobbin to stop the bobbin or to tighten a selvage will not work anymore. And you cannot allow one of the bobbins have too much drag, as then that thread will come out of the shuttle a shorter length than it�s partner. Each bobbin will let out the thread length which is necessary. If your bobbins do not fit into your double bobbin shuttle, or are too long for the bobbin to move back and forth, quills are an easy solution.
Weaving Narrow Warps
The only problem I have had with a double bobbin shuttle is when I weave a very narrow warp, less than 12 inches. This can be a problem with a single bobbin shuttle and the solution is the same. With any shuttle, this narrow width does not have enough thread length to create any pull on the weft. On a wider warp you can solve the problem of loops at the selvages by simply throwing the shuttle faster. But on a narrow warp, there can be loops of weft at the selvage. First, be sure that you do not fill the quills too full. Then be very careful as you wind the quills, putting some tension on the thread. For threads which are springy like linen, it is helpful to put a damp cloth in your hand when winding the linen onto the quill. If this is not enough moisture, you can wrap the wound quill in the damp cloth for a few minutes before you begin weaving. A little moisture will tame a springy linen thread and will eliminate static electricity you get from synthetic threads and dry air. If you still need to put the shuttle down and put the threads in place, there is another thing that you can try for narrow warps. Try a piece of fake fur, about 1 inch by 2 inches. Secure a piece into each bobbin box. This works well with most threads. Of course, this requires that you have a double bobbin shuttle which have a solid bottom.
Traditional Boat Shuttles
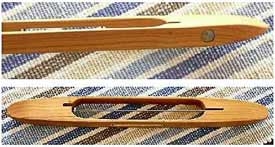
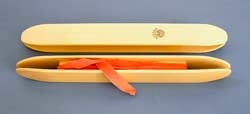
If one looks at traditional hand weaving shuttles, you will find a shape, size and weight similar to the one in this photo. I have some antique Swedish shuttles and it is fun to weave with them.
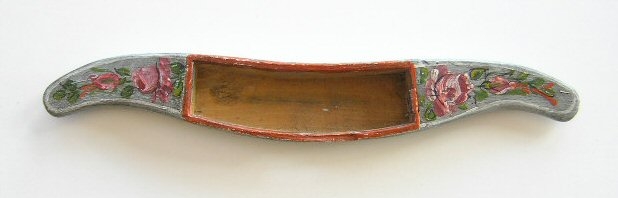
Here is a photo of a typical antique Swedish shuttle. The side of the shuttle has the �pregnant� looking curve where the thread exits through a hole. This curve gives the added distance needed for the thread to easily come off the quill. This shuttle was made with the opposite side also curving. Most of today's shuttles do not have these curves as straight shuttles are easier to manufacture. This shuttle is 11 1/2 inches long, 7/8 inches tall and has space for a 4 inch quill. It weighs 2 1/4 oz. Someone saved this old shuttle and painted it.
These two shuttles are antique Swedish weighted shuttles. Lead weights have been inserted into holes on each side of the shuttle. Adding some weight makes the shuttle go a little further when you throw it. The shuttle on the left has these holes covered with circular pieces of wood. Photo photos missing below and need to be addedThe tips of this shuttle are made of horn. The shuttle on the right has copper added to the tips to protect them. These shuttles are 11 and 12 inches long, 3/4 inch tall and weigh 2 3/4 and 3 oz. Most antique Swedish shuttles were made by young men gifting them to young women they wanted to marry. So they did their best to carve a perfect shuttle.
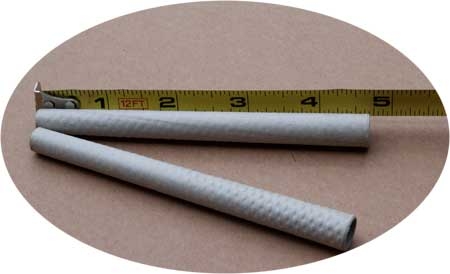
Making a Paper Quill
Quills work in most all shuttles. Whether you buy cardboard quills or make paper quills, you can cut them to length. They are inexpensive so you can have extras handy when you need them. And because they are also thinner, they will hold more thread than you would suspect. Use a thin spindle bobbin winder to wind them. To make paper quills use thin paper and cut a rectangle about 4 by 5 inches. Place the paper on the spindle of your winder, near the outside, thinner end of the spindle. Wrap the paper around the spindle and begin to turn the handle of the winder. That is usually clockwise. When the paper is nearly all wound onto the spindle, push the paper into the thicker part of the spindle to tighten the fit. Insert the end of the thread into the last loop of paper as you turn the handle. The thread will then start winding around the paper. Keep the shuttle close by so that you can wind your quill the right size. When full, trim the ends of the paper to the right length. If you find this hard to do, or if you prefer a studier quill, you can use glue to make a reusable quill. This is a better solution if you have a thick spindle bobbin winder, as you need to use a thicker paper and glue helps to make it more solid.
The Fly Shuttle is the Origin of the End-delivery Shuttle
It is possibly the inability of some weavers to find someone to show them how to properly use a boat shuttle or wind a quill, or it is the result of using a poorly designed, bulky shuttle, which has brought about the interest in the end-delivery shuttle. Fly shuttle attachments on loom beaters use an end-delivery shuttle, sometimes incorrectly called an end-feed shuttle. These shuttles hold pirns instead of quills. The pirns do not rotate, instead, the thread is pulled off the pirn and exits on the right side of the shuttle. My end delivery shuttle which came with my fly shuttle attachment weighs 9 1/2 oz and was never designed to be used as a boat shuttle is used. It works perfectly on my fly shuttle, but it is way to heavy to throw as a hand shuttle. Plus, it is 15 1/2 inches long, bullet shaped with metal tips and much too bulky to throw as a shuttle. It is 1 3/8� tall, making it necessary to have a larger shed, which in turn can wreck havoc to selvages. I mention this because I have heard about hand weavers who are using heavy, bulky shuttles from fly shuttle beaters for hand throwing.
Pirn which fits into an end-delivery shuttle. IMAGE GOES HERE
Should I get the new end-delivery shuttle?
Some of the new end-delivery shuttles are designed to use in place of a boat shuttle. These new shuttles have been changed from the original fly shuttle design so that they can be thrown. They have a better shape for your hand and they don�t have the metal tips. The first ones were a bit too heavy and long, but the more recent ones are smaller and lighter. Some end-delivery shuttles are specifically designed for fine threads, some for thicker threads and some for a specific type of thread. One shuttle will not weave every weft thread and some threads might not work in any end-delivery shuttle. Ask about this when you inquire about these shuttles. Many weavers like end-delivery shuttles, but if you purchase some because you are having trouble with your boat shuttle, it is a very expensive solution. I would like to caution you also, that they are heavier than boat shuttles. Throwing that extra weight might not be what your wrists and elbows will want to do. So, when you are looking to purchase one, check to see what it weighs. Before making the big investment, check your boat shuttle and bobbin and see what proper quills and proper winding can do to make your weaving easier.
Learning to use the end-delivery shuttle
As with a boat shuttle, you need to learn to use the end-delivery shuttles and they have their own special requirements. You need to set the tension for each weft thread you are using. Practice with your thread to understand your tension system and to determine how much tension you will need. Sometimes there is a tool needed, so find a good place to keep it where you will find it again. Since the thread exits out the right side of the shuttle, your results may vary on each selvage. As you weave, the thread on the right side is pulled away from the selvage further than from the left side. You might either get a too loose right selvage or a too tight left selvage, especially on narrow warps. You will need to practice not extending your right arm as far out as you do your left. Often it is best to sit off center to the left when weaving a narrow warp to help off set this imbalance. Be aware that when each loop of thread comes off the pirn, one twist is added to the thread. So, if you are using an over twisted thread, you will need to work with this extra twist. I do not find this to be a problem when using my fly shuttle. But this twist is a problem for weaving with ribbons or other flat wefts which you do not want twisted.
If you would like more information on shuttles, bobbins, quills, winding paper quills, weaving, selvages, go to the FAQ section.
Bobbin Winders
Choose your boat shuttle before you purchase bobbins or quills and before you purchase a bobbin winder. You will need a winder that can wind the quills which fit the shuttle you choose. Choose a boat shuttle which is comfortable for your hand. The smaller ones are the easiest to catch and throw, but if you weave wide fabrics, choose one which is somewhat longer. Thick shuttles may be clumsy to catch and throw. Heavy shuttles are more likely to break warp threads they may hit, but will be easier to throw through a wide shed. Shuttles with very blunt tips may not travel through the shed as well as more pointed ones.
Rug Shuttles
Ski shuttles and double ski shuttles can hold much more weft material than a boat shuttle and are appropriate for weaving rugs. You must unwind the weft from them as you weave, so they should not be longer than is practical. If you do not fill them too full, they can be thrown across a wide warp. They should not be too tall to travel easily through an ordinary shed. Stick shuttles cannot be thrown, but are less expensive and very useful for narrow warps and vertical looms.
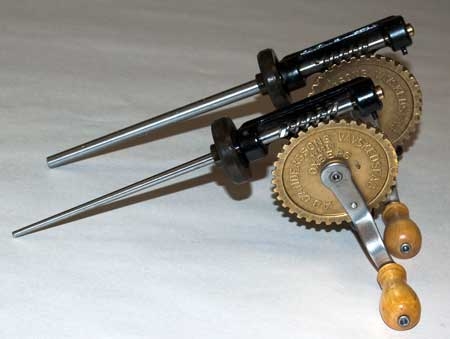
Bobbin Winders
Winders come with either the fine spindle or the thicker spindle which is made for the larger American bobbins. The fine spindle is more versatile as you can also wind the larger bobbins on them. Just put a cardboard quill on the spindle and then put the larger bobbin on top of the quill. It usually is a perfect fit. If you want to weave with fine threads, the thinner shuttles, thinner quills and fine spindle bobbin winder might be better. They wind very fast and you can wind more thread onto the finer quills.>
Bobbin Lace Pillows
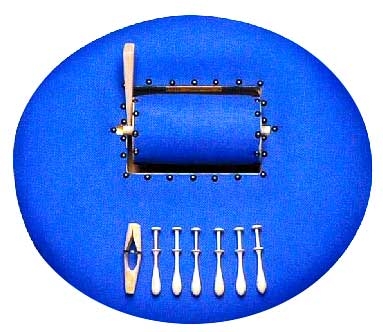
The Glimakra bobbin lace pillow has a 9 1/2" roller in the center. On the bottom left of the photo is a bobbin holder to use on your thread bobbin winder. This attachment lets you wind the lace bobbins on your bobbin winder. The bobbins are 4" long. These are very nicely made and you will enjoy lace making with them.